To install a 360 degree camera in your car, first, locate a suitable mounting position inside the vehicle. Then, follow the manufacturer’s instructions to securely attach the camera and connect it to the car’s power source and display unit.
Introducing a 360 degree camera to your car can provide a significant upgrade to your driving experience. With its ability to capture a complete view of your surroundings, this advanced camera system enhances your safety and eliminates blind spots. Whether you’re maneuvering through tight spaces or parking in crowded areas, the 360 degree camera offers unparalleled visibility.
We will guide you through the step-by-step process of installing a 360 degree camera in your car, enabling you to enjoy a comprehensive view of the road ahead.
Preparation For Camera Installation
When it comes to installing a 360-degree camera in your car, proper preparation is key to ensure a successful installation. Taking the time to assess vehicle compatibility, choosing the right camera model, and gathering the necessary tools and equipment will not only make the installation process smoother but also ensure optimal performance of your camera.
Assessing the Vehicle Compatibility
Before proceeding with the installation, it is essential to assess the compatibility of your vehicle with a 360-degree camera. Different car models may have varying requirements and limitations when it comes to installing aftermarket cameras. Therefore, it is crucial to refer to your car’s user manual or consult with a professional to determine if your vehicle can accommodate a 360-degree camera.
Choosing the Right 360-Degree Camera Model
Choosing the right camera model is vital to ensure compatibility and optimal performance. With a vast range of options available in the market, it can be overwhelming to make the right choice. Consider factors such as image quality, field of view, camera dimensions, and features that align with your specific requirements. Research different camera models read reviews, and compare specifications to make an informed decision.
Gathering Necessary Tools and Equipment
Once you have assessed vehicle compatibility and chosen the camera model, it’s time to gather the necessary tools and equipment for the installation. Having all the right tools on hand will save you both time and effort. Here is a list of essential tools you will likely need:
- Wire stripper
- Electrical tape
- Drill and drill bits
- Mounting brackets or adhesive strips
- Screwdriver set
- Zip ties
- Electrical connectors
- Fuse tap kit
- Trim removal tools
It is crucial to ensure that each tool is in good condition and suits the specific requirements of your camera installation. While some tools may already be available in your toolbox, others may need to be purchased separately.
By assessing vehicle compatibility, choosing the right camera model, and gathering the necessary tools and equipment, you are well-prepared to embark on the installation of a 360-degree camera in your car. Taking the time to prepare thoroughly will increase the chances of a successful installation and ensure that you can enjoy the benefits of enhanced visibility and safety provided by a 360-degree camera system.
Wiring The Camera System
One of the most important steps in installing a 360-degree camera in your car is wiring the camera system. This involves locating the ideal camera position, running the camera wires through the vehicle, and connecting the camera to the power source. In this section, we will guide you through each step of the wiring process, ensuring a seamless installation of your new 360-degree camera system.
Locating the ideal camera position
Before you start running the camera wires, it’s crucial to determine the ideal camera position for your 360-degree camera. This will ensure maximum coverage and effectiveness of the camera system. It’s recommended to choose a location on your car that provides an unobstructed view and minimizes blind spots.
Here are a few factors to consider when finding the perfect camera position:
- Mounting stability: Ensure that the camera will be securely mounted and won’t move or vibrate while driving.
- Coverage angle: The camera should be able to capture a full 360-degree view of the car surroundings.
- Protection from elements: It’s essential to choose a location that protects the camera from weather conditions such as rain, dust, or extreme temperatures.
Running the camera wires through the vehicle
Once you have determined the ideal camera position, the next step is running the camera wires through your vehicle. This involves routing the wires from the camera location to the interior of your car, where the camera system will be connected.
Follow these steps to run the camera wires:
- Identify existing wire routes: Look for existing wire routes or openings in your car’s body where you can pass the camera wires through. This can include areas like door frames or existing wire harnesses.
- Use wire clips: Secure the camera wires using wire clips or zip ties, ensuring they are neatly fastened and won’t interfere with other components or moving parts of your car.
- Avoid sharp edges: Make sure the camera wires are carefully routed away from sharp edges, rough surfaces, or any potential sources of damage.

Connecting the camera to the power source
Once the camera wires are successfully routed through your vehicle, it’s time to connect the camera to the power source. This step is crucial for the camera system to function correctly and provide the desired 360-degree view.
Follow these steps to connect the camera to the power source:
- Identify a suitable power source: Choose a power source that can handle the camera system’s power requirements. This can be your car’s fuse box, battery, or an auxiliary power outlet.
- Check polarity: Ensure that the camera wires are connected to the power source with the correct polarity, following the manufacturer’s instructions. Incorrect polarity can lead to malfunctioning or damage to the camera system.
- Secure connections: Use appropriate wiring connectors or soldering to secure the connections between the camera wires and the power source. This will ensure a reliable and long-lasting connection.
By carefully following these steps, you can successfully wire your 360-degree camera system, allowing you to enjoy a comprehensive view of your car’s surroundings.
Mounting The 360 Degree Camera
Mounting a 360-degree camera in your car is a great way to enhance your driving experience by providing a comprehensive view of your surroundings. Whether you want to improve safety or capture your adventures on the road, installing a 360-degree camera is a simple process that can be done by following a few steps. In this guide, we will walk you through the process of selecting the appropriate camera mounting location, securely installing the camera in the chosen position, and adjusting the camera angle for optimal viewing.
Selecting the appropriate camera mounting location
Choosing the right location for mounting your 360-degree camera is crucial to ensure optimal views of the surroundings. Here are a few factors to consider:
- Visibility: Select a location that provides an unobstructed view of the road and surroundings without any interference from vehicle parts or accessories.
- Protection: Ensure that the camera is mounted in a position that offers it protection from potential damage, such as bumps, impacts, or weather conditions.
- Wiring: Take into account the length of the camera’s wiring when choosing a mounting location. Make sure it is long enough to reach the desired location without any strain or tension.
- Compatibility: Check the compatibility of the camera with the chosen mounting location. Some cameras may be specifically designed for certain areas, such as the front or rear of the car.
Installing the camera in the chosen position securely
Once you have selected the ideal mounting location, it’s time to securely install the 360-degree camera. Follow these steps:
- Prepare the mounting surface: Clean the area where you will be mounting the camera, ensuring it is free from any dirt, dust, or grease.
- Position the mount: Place the mounting bracket or plate in the chosen location, ensuring it is aligned properly with the camera’s lens and angle.
- Secure the mount: Use screws, adhesive tapes, or any other appropriate method to securely attach the mount to the chosen surface. Ensure it is firmly in place and stable.
- Attach the camera: Depending on the camera model, you may need to slide or screw the camera onto the mount. Follow the manufacturer’s instructions for proper attachment.
Adjusting the camera angle for optimal view
After securely installing the camera, it’s time to adjust its angle for the best field of view. Follow these steps:
- Test the initial view: Turn on the camera and review the initial view it captures. Make note of any adjustments needed for clarity or coverage.
- Make adjustments: If necessary, loosen the camera’s mounting screws or brackets to adjust its angle. Experiment with different angles to find the best view of the surroundings.
- Ensure stability: Once you have found the optimal angle, tighten the mounting screws or brackets to secure the camera in place. Ensure that it remains stable during your drives.
By following these steps, you can easily mount a 360-degree camera in your car, providing you with a comprehensive view of your surroundings. Enjoy enhanced safety and capture your moments on the road like never before!
Connecting The Camera To The Display Unit
Installing a 360-degree camera in your car can greatly enhance your driving experience, providing you with a comprehensive view of your surroundings. However, to fully benefit from this cutting-edge technology, it is essential to connect the camera to the display unit correctly. In this section, we will go over the necessary steps to make sure your camera installation is a success.
Identifying the display unit location
The first step in connecting your 360-degree camera to the display unit is to locate the position of the unit within your car. Depending on the make and model of your vehicle, the display unit may be integrated into the dashboard, positioned on the center console, or even built into the rearview mirror. Take a moment to familiarize yourself with the location of the display unit, as this will help you plan the cable routing effectively.
Running the cables from the camera to the display unit
Next, you need to run the necessary cables from the camera to the display unit. Begin by identifying the optimal route for the cables, ensuring they are hidden and secured along the way. It is crucial to avoid obstructing any moving parts or interfering with the functionality of other car components. Use cable clips or tape to secure the cables in place, minimizing any potential hazards or distractions while driving.
Establishing the proper connection between camera and display
With the cables properly routed, it’s time to establish the connection between the camera and the display unit. Refer to the manufacturer’s instructions to determine the specific type of connection required. Typically, this involves connecting the corresponding cables, whether it be through HDMI, AV, or USB ports. Ensure that each connection is firmly secured, as loose connections may result in a poor display or loss of video feed.
Once the physical connections are established, it is essential to power on both the camera and the display unit to ensure proper functionality. Check that the camera feed is coming through on the display, and make any necessary adjustments to the settings for optimal performance.
In conclusion, connecting the camera to the display unit is a crucial part of installing a 360-degree camera in your car. By following these steps and taking the necessary precautions, you can enjoy a seamless installation and experience the benefits of an enhanced view of your surroundings while driving.
Testing And Calibrating The Camera System
Verifying the camera functionality
Before you begin testing and calibrating your 360-degree camera system, it’s crucial to verify that the camera is functioning correctly. This will ensure that you can capture clear and accurate footage while on the road. Here are a few steps to follow:
- Check the camera’s power source: Ensure that the camera is receiving power either through a direct connection to the car’s battery or via another power source.
- Confirm the camera lens is clean: Clean the lens with a microfiber cloth to remove any dirt or smudges that might affect the camera’s performance.
- Activate the camera: Turn on the camera to confirm that it powers up and that the LED lights are functioning correctly. If any issues arise, consult the camera’s user manual for troubleshooting steps.
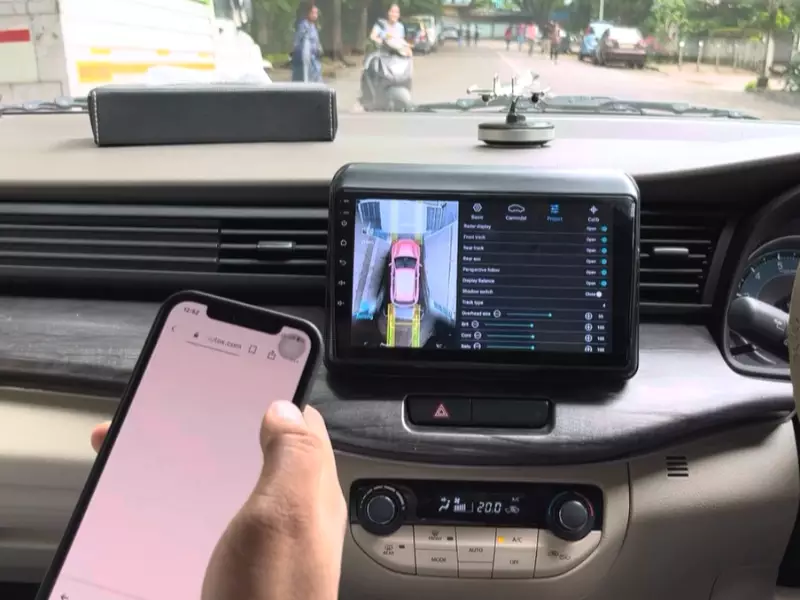
Adjusting camera settings for panorama view
Once you’ve verified the camera’s functionality, it’s time to adjust the settings to capture a 360-degree panorama view. Follow these steps:
- Access the camera’s settings: Depending on your camera model, you may be able to adjust the settings through buttons on the camera itself or through a dedicated app on your smartphone.
- Select panorama mode: Look for an option to switch the camera to panorama mode. This will ensure that it captures a full 360-degree view.
- Set the resolution: Adjust the resolution settings to your preference. Higher resolutions may result in sharper images but could also require more storage space.
- Configure exposure and white balance: Experiment with exposure and white balance settings to ensure that the captured images are well-lit and color-balanced.
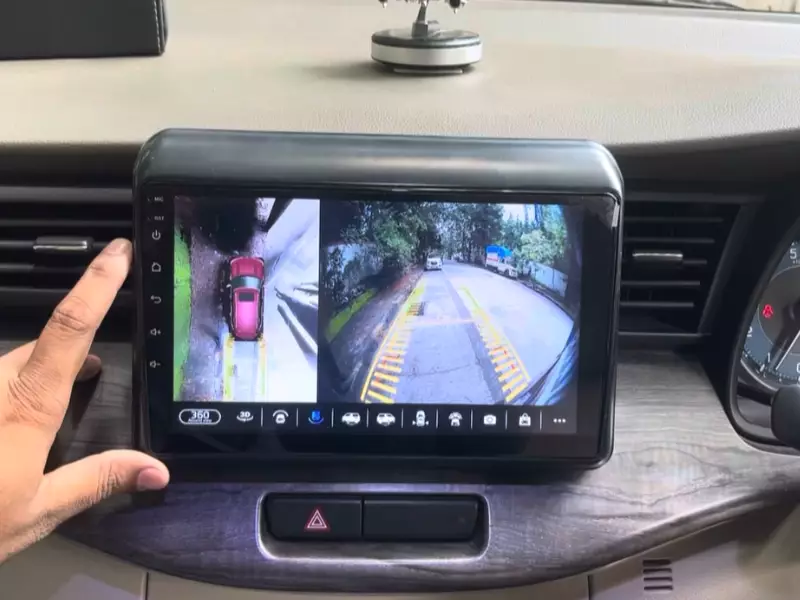
Ensuring accurate image stitching and calibration
To obtain seamless and accurate images from your 360-degree camera system, it’s essential to verify that the image stitching and calibration are precise. Follow these steps:
- Mount the camera securely: Ensure that the camera is securely mounted in a central position on your vehicle, providing an unobstructed view of the surroundings.
- Perform calibration test: Drive around and capture footage with the camera. Review the recorded video to check for any distortions or misalignments. If necessary, consult the camera’s user manual for calibration instructions.
- Adjust camera angles: If you notice any issues with image alignment or distortion, try adjusting the camera angles slightly to correct the problem.
- Double-check image stitching: Ensure that the stitched images appear seamless and that there are no noticeable gaps or overlaps between different camera perspectives.
By following these steps, you can test, adjust, and calibrate your 360-degree camera system effectively. This will enable you to capture high-quality footage that provides a complete view of the road and surroundings while driving. Remember to regularly inspect and maintain your camera system to ensure optimal performance.
Final Touches And Troubleshooting
After successfully installing your 360-degree camera in your car, there are a few final touches that need to be made to ensure a smooth and glitch-free experience. These final steps involve securing all loose wires and cables, checking for any potential interference or glitches, as well as troubleshooting common installation issues.
Securing all loose wires and cables
One of the most important steps in the installation process is securing all loose wires and cables. This not only ensures a clean and organized setup but also prevents any potential damage or interference while driving.
The first thing you should do is carefully inspect all the connections to ensure they are secure and properly plugged in. Make sure to zip tie or use cable clips to neatly organize the wires and prevent them from tangling or getting in the way of any moving parts within the car.
Additionally, it’s a good practice to use electrical tape or cable management sleeves to protect the wires from moisture or any potential damage. This step will go a long way in prolonging the lifespan and performance of your 360-degree camera in the long run.
Checking for any potential interference or glitches
Once all the wires and cables are securely in place, it’s important to check for any potential interference or glitches that may affect the functionality of your 360-degree camera.
Start by turning on your camera and carefully inspecting the footage for any abnormal colors, lines, or flickering. If you notice any visual anomalies, it’s likely that there is interference from another electronic device or a loose connection somewhere in the system.
To troubleshoot this issue, try turning off any nearby electronic devices one by one to identify the source of interference. Additionally, double-check all connections to ensure they are tight and properly connected.
Troubleshooting common installation issues
Even with careful installation, sometimes issues can arise. Here are some common installation issues and how to troubleshoot them:
Issue 1: No power to the camera
If your camera is not receiving any power, the first step is to check the power source. Ensure that the power cables are connected properly to both the camera and the power supply. If the connections are secure, check the fuse box for any blown fuses that may be causing the issue. Replace any blown fuses and test the camera again.
Issue 2: Poor video quality or distortion
If you’re experiencing poor video quality or distortion in the footage, first check the camera lens for any dirt or smudges. Clean the lens with a microfiber cloth or lens cleaner, being careful not to scratch the surface. If the issue persists, verify that the camera is positioned correctly and adjust the angle if necessary. Additionally, make sure the camera settings are optimized for your specific car model and lighting conditions.
Issue 3: Camera not booting up or freezing
If your camera is not booting up or frequently freezing, try performing a reset by disconnecting the power source for a few minutes, and then reconnecting it. This will reset the camera and potentially resolve any software glitches. If the issue continues, check for any firmware updates from the manufacturer and ensure your camera is running the latest version.
By following these steps, you can ensure that your 360-degree camera is properly installed and functioning optimally in your car. Regularly check for any loose wires or potential interference, and troubleshoot any common installation issues to keep enjoying the benefits of a 360-degree view while driving.
Tips For Maintenance And Care
Maintaining and caring for your 360-degree camera is essential to ensure its optimal performance and longevity. Regularly cleaning the camera lens, checking for any loose connections over time, and taking proper precautions for extreme weather conditions are crucial aspects of camera maintenance. In this section, we will discuss each of these tips in detail.
Regularly cleaning the camera lens
Cleaning the camera lens regularly is vital to ensure clear and vivid footage. Dust, dirt, and debris can accumulate on the lens, affecting the image quality. To clean the lens:
- Gently remove any loose particles or debris using a soft microfiber cloth or lens cleaning brush.
- Dampen another microfiber cloth with lens cleaning solution or isopropyl alcohol.
- Gently wipe the lens in a circular motion until it is clean and free from smudges or marks.
- Allow the lens to air dry or use a clean, dry cloth to remove any remaining moisture.
Regularly cleaning the camera lens will ensure clear and sharp images, providing you with a better viewing experience.
Checking for any loose connections over time
Over time, vibrations and movement can cause connections to become loose. It is crucial to regularly check for any loose connections to ensure the proper functioning of your 360-degree camera. Follow these simple steps to check for loose connections:
- Turn off the camera and safely disconnect any cables.
- Inspect the cable connections, ensuring they are securely plugged in.
- If you notice any loose connections, gently reattach the cable, making sure it is properly seated.
- Tighten any screws or fastenings if necessary.
By regularly checking for loose connections, you can prevent potential issues and ensure your camera operates smoothly.
Taking proper precautions for extreme weather conditions
Extreme weather conditions such as excessive heat, cold, rain, or snow can impact the performance of your 360-degree camera. To protect your camera from adverse weather conditions, consider the following precautions:
- During hot weather, avoid leaving your car parked for extended periods in direct sunlight, as excessive heat can damage the camera’s components.
- During cold weather, ensure your camera is adequately protected from freezing temperatures by using a weatherproof housing or cover.
- If you anticipate heavy rain or snowfall, consider using a waterproof cover for your camera to prevent water damage.
- Regularly inspect the camera for any signs of damage caused by extreme weather conditions.
By taking proper precautions for extreme weather conditions, you can safeguard your camera and prolong its lifespan.
Frequently Asked Questions Of How To Install 360 Degree Camera In Car
Can I Add 360-Degree Camera To the Car?
Yes, it is possible to add a 360-degree camera to your car. This camera provides a complete view of your surroundings, enhancing your safety and driving experience. With the right installation and compatibility, you can enjoy the benefits of a 360-degree camera system in your vehicle.
How Do You Hook Up A 360 Camera?
To hook up a 360 camera, simply connect it to your device using a USB or HDMI cable. Install any necessary software or apps, and follow the instructions to set it up. Ensure your device is compatible with the camera, and enjoy capturing immersive, panoramic footage.
What Is The Disadvantage Of 360 Camera?
The main disadvantage of a 360 camera is its limited resolution. Due to the need to capture a wide field of view, the image quality may not be as high as with traditional cameras.
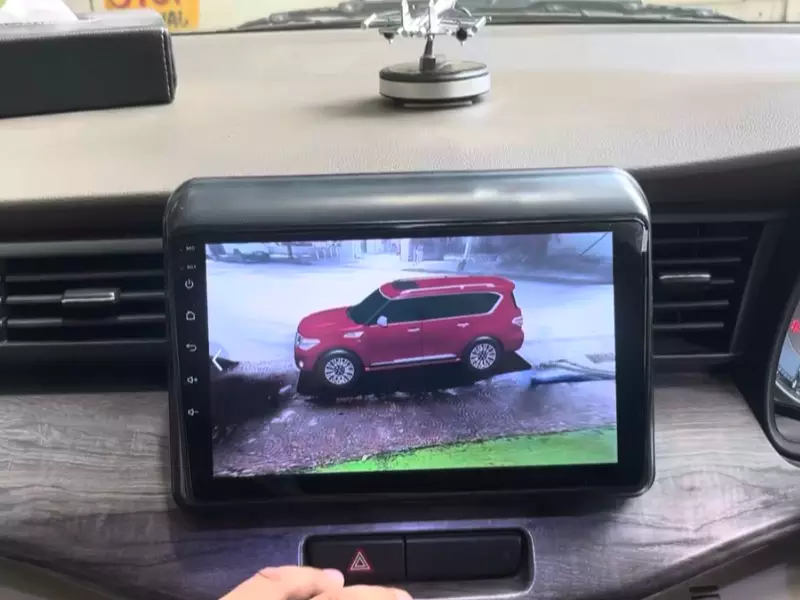
Where Is 360-Degree Camera Placed On A Car?
The 360-degree camera on a car is usually placed on the front, rear, and sides, providing a comprehensive view of the surroundings. It helps in parking, maneuvering, and enhancing overall safety.
Conclusion
Installing a 360 degree camera in your car can greatly enhance your driving experience. With its panoramic view, you can navigate and park with ease, ensuring safety on the road. Get ready to explore new horizons and capture stunning moments as you hit the road! So, follow the steps we discussed and equip your car with this incredible technology today.
Happy driving!