To install a 2-channel line output converter, you will need to follow these steps: first, locate the factory audio unit; second, disconnect the wiring harness; third, connect the speaker wire to the input terminals of the line output converter; fourth, connect the RCA cables from the converter to the amplifier; fifth, reconnect the wiring harness to the audio unit; lastly, connect the power and ground wires to the converter. This process will allow you to add an amplifier and improve the audio quality in your vehicle.
The installation of a 2-channel line output converter can greatly enhance the sound system in your car. By adding an amplifier, you can experience a more powerful and balanced audio output. In this guide, we will outline the steps needed to install a 2-channel line output converter in your vehicle.
Adhering to these instructions will ensure a successful installation that improves your audio experience while driving. So, let’s dive into the installation process and get started on upgrading your car’s sound system.
What Is A Line Output Converter And Why Do You Need It?
Definition and function of a line output converter
A line output converter (LOC) is a device that is used to convert the speaker level output of a car stereo system into a line level output. The line level output is typically used for connecting an amplifier or additional audio devices, such as subwoofers or external speakers, to the existing car stereo system.
The main function of a line output converter is to convert the high voltage audio signal from the car speaker wires into a low voltage signal that the amplifier can accept. This allows for a clean and distortion-free audio signal to be sent to the amplifier, resulting in improved sound quality and increased power output.
Explanation of why line output converters are necessary for certain audio installations
In certain audio installations, a line output converter is essential for achieving optimal audio performance. Here are a few reasons why:
- Compatibility: Many car stereo systems do not have dedicated preamp outputs, which are required for connecting an amplifier directly. By using a line output converter, you can tap into the speaker wires and convert the signal to a level that the amplifier can handle.
- Power handling: Car speakers are designed to handle the power output of the car stereo system, which is typically lower than what an amplifier can provide. By using a line output converter, you can ensure that the power sent to the speakers is balanced and within their optimal range, preventing damage to the speakers.
- Signal quality: When connecting an amplifier directly to the speaker outputs of a car stereo system, you may encounter noise or interference due to the high voltage signal. A line output converter helps to eliminate this issue by converting the signal to a lower voltage, resulting in a cleaner and more accurate audio signal.
Overall, a line output converter is an essential component for achieving the best audio performance in certain car audio installations. It allows for seamless integration of amplifiers and other audio devices, while ensuring compatibility, power handling, and signal quality.
Choosing The Right 2-Channel Line Output Converter
When installing a car audio system, having a quality line output converter is crucial to ensure a seamless integration with your existing factory stereo. A line output converter, also known as an LOC, converts speaker-level audio signals into a pre-amp level signal that can be connected to an aftermarket amplifier or a powered subwoofer. However, with so many options available in the market, it can be overwhelming to choose the right 2-channel line output converter for your needs. In this section, we will discuss the factors to consider and the features to look for when selecting a line output converter.
Factors to consider when selecting a line output converter
Before diving into the various features of a 2-channel line output converter, it’s important to consider a few factors that will help you make an informed decision:
- Compatibility: Ensure that the line output converter is compatible with your specific car make and model. Different vehicles may have different electrical systems and audio configurations, so it’s crucial to choose a converter that will work seamlessly with your car’s stereo system.
- Power handling: Consider the power handling capabilities of the line output converter. Look for one that can handle the power output of your factory stereo system without distortion or potential damage.
- Adjustability: Some line output converters offer adjustable settings such as gain control, high-pass filters, and low-pass filters. These adjustments allow you to fine-tune the output signal based on your preferences and the requirements of your aftermarket audio components.
- Installation: Evaluate the installation process of the line output converter. Look for a converter that is easy to install and comes with clear instructions or wiring diagrams. If you’re not comfortable with DIY installations, consider seeking professional help.
Features to look for in a 2-channel line output converter
Now that you have considered the important factors, let’s delve into the key features that you should look for in a 2-channel line output converter:
- High-quality audio reproduction: The line output converter should be capable of preserving the audio quality while converting the speaker-level signals to line-level signals. Look for a converter that minimizes signal loss and provides a clean and accurate audio output.
- Noise cancellation: A good line output converter should have effective noise cancellation capabilities to reduce unwanted interference and ensure a clean and clear audio signal.
- Size and compactness: Consider the size and compactness of the line output converter. A smaller and compact converter will be easier to install and fit in tight spaces within your vehicle.
- Input and output options: Check the input and output options provided by the converter. Look for inputs that can accept a wide range of speaker-level signal voltages, and outputs that are compatible with various aftermarket amplifiers and subwoofers.
- Durability and reliability: Choose a line output converter that is built to last and can withstand the demanding conditions of a car environment. Look for converters made from high-quality materials that are resistant to heat, moisture, and vibration.
By considering these factors and looking for these features, you can ensure that you choose the right 2-channel line output converter for your car audio system. A well-selected converter will enhance your audio experience and allow you to enjoy your favorite music with enhanced clarity and power.
Gathering The Necessary Tools And Materials
Before you begin installing a 2-channel line output converter, it’s crucial to gather all the necessary tools and materials. By ensuring you have everything you need beforehand, you’ll be able to complete the installation smoothly and efficiently. Here is a comprehensive list of the tools and materials you will need:
List of tools and materials needed for the installation process
| Tools | Materials |
|---|---|
|
|
Once you have gathered all of these tools and materials, you can proceed with the installation confidently. Each of these items plays a crucial role in ensuring a successful installation process.
With your screwdriver set, you’ll be able to remove any necessary panels or trim in order to access the existing audio system. The wire stripper and wire cutter are essential for preparing the wires for connections. Meanwhile, the socket wrench allows you to remove the necessary components, such as the battery terminal or amplifier ground.
Electrical tape and heat shrink tubing are vital for insulating and protecting the connections you make during the installation. Butt connectors will provide secure and reliable electrical connections between wires. Additionally, zip ties help with organizing and securing the wiring, preventing any potential interference or damage.
When it comes to materials, the 2-channel line output converter is the primary component needed for the installation. It allows you to connect the factory audio system to an external amplifier, enhancing the audio quality in your vehicle. The wiring harness adapter simplifies the installation process by providing a plug-and-play connection to the existing system.
Wire crimp connectors are used to join wires securely, ensuring optimal signal transfer. High-quality speaker wire is essential for connecting the line output converter to the amplifier. The fuse holder and fuse protect the system from electrical faults and overloads.
Ring terminals and the amplifier wiring kit are necessary for connecting the system to the vehicle’s power supply. Finally, the ground wire ensures proper grounding, which is crucial for optimal performance and safety.
By gathering all of these tools and materials before starting the installation, you’ll save time and avoid potential frustration. With everything at your disposal, you can confidently proceed with the installation process, knowing that you have everything you need to successfully install a 2-channel line output converter.
Identifying The Location For Installation
Installing a 2-channel line output converter is an important step when upgrading your car’s audio system for better sound quality and power. However, to ensure optimal performance, it is crucial to choose the right location for its installation. In this section, we will discuss the considerations for selecting the optimal spot for your line output converter and the factors you should avoid.
Considerations for choosing the optimal location for the line output converter
When selecting the location for your line output converter, there are a few key factors to take into account:
- The proximity to the factory audio unit: Choose a spot that allows for a direct connection to the factory audio unit. This will ensure that the line output converter receives a clean and strong signal from the pre-existing audio system.
- Accessibility: Make sure the chosen location is easily accessible. This will come in handy when you need to make adjustments or troubleshoot any issues that may arise in the future.
- Noise interference: Keep the line output converter away from sources of electrical interference, such as power cables, ignition systems, or any other components that generate electrical noise. This will help minimize distortion and ensure a crisp and clear sound output.
Factors to avoid when selecting the installation spot
While choosing the right location is important, there are certain factors that you should avoid to ensure optimal performance:
- Heat-intensive areas: Avoid mounting the line output converter in areas that are prone to excessive heat, such as near the car’s exhaust system, engine, or any other heat-producing components. High temperatures can damage the converter and lead to poor sound quality.
- Moisture-prone areas: Steer clear of mounting the line output converter in areas where it may come into contact with moisture or water, such as near the windows, sunroof, or areas prone to leakage. Moisture can cause corrosion and potentially render the converter ineffective.
- Vibrating parts: Do not install the line output converter near parts of the car that vibrate excessively, such as the subwoofer or speaker enclosures. Vibrations can introduce unwanted noise and affect the overall audio quality.
By considering these factors and avoiding the mentioned pitfalls, you can ensure that your line output converter is installed in the optimal location, delivering the best sound performance for your car audio system.
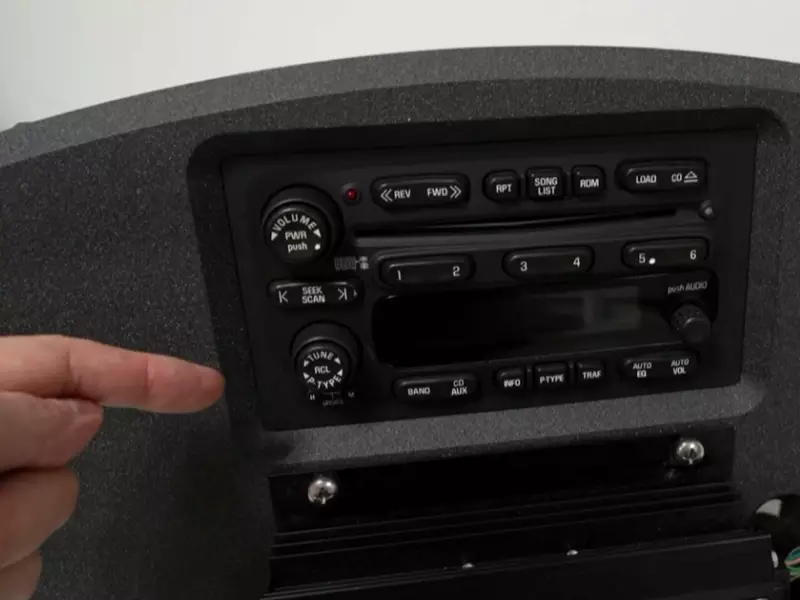
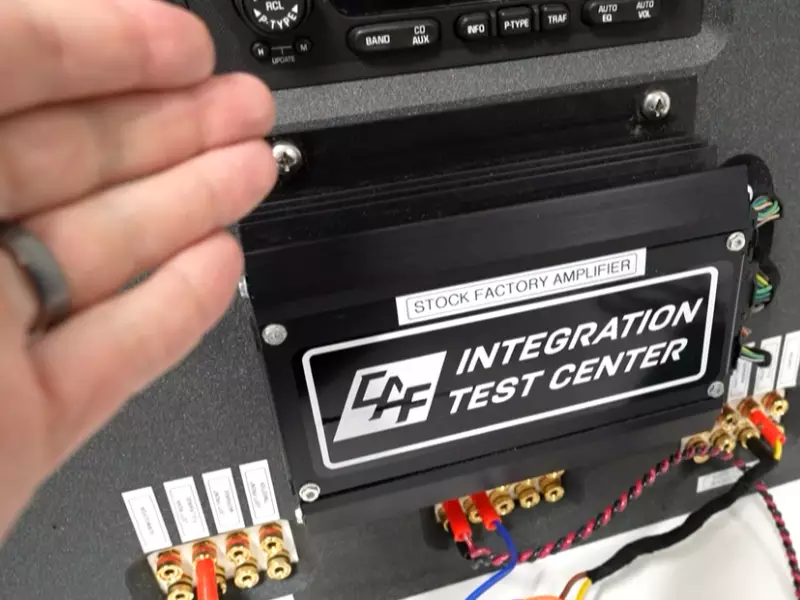
Locating And Accessing The Factory Stereo
Before you can install a 2-channel line output converter in your vehicle, you need to locate and access the factory stereo. This may vary depending on the make and model of your vehicle. In this section, we will discuss the steps to find and access the factory stereo in your specific vehicle model and the techniques for removing the necessary panels or covers to gain access.
Steps to find and access the factory stereo in your specific vehicle model
In order to find and access the factory stereo in your vehicle, you can follow these steps:
- Consult the vehicle’s manual: Start by referring to the vehicle’s manual to determine the location of the factory stereo. The manual should have specific instructions and diagrams that can guide you in locating the stereo.
- Check the dashboard: In most vehicles, the factory stereo is located in the dashboard. Look for a rectangular unit with buttons and dials that resemble a stereo system.
- Inspect the center console: Some vehicles may have the stereo unit placed in the center console. This area often houses various controls and multimedia features, including the stereo.
- Search the glove compartment: In certain vehicle models, the factory stereo may be installed inside the glove compartment. Open the glove compartment and check for any hidden panels or compartments that might conceal the stereo.
- Look for removable panels: In case the stereo is not immediately visible, there may be removable panels or covers that need to be taken off to access the stereo. These panels can be found on the dashboard, center console, or in the surrounding area.
Techniques for removing the necessary panels or covers to gain access
Once you have located the factory stereo, you may need to remove certain panels or covers to gain access. Here are a few techniques you can use:
- Use a trim removal tool: A trim removal tool is a handy tool designed to remove panels and covers without causing damage to the surrounding areas. Insert the tool between the panel and the surface it is attached to and gently pry it open.
- Apply gentle force: In some cases, the panels or covers may be held in place with clips or retainers. Applying gentle force with your hands or using a cloth-covered tool can help release these clips and allow you to remove the panel.
- Unscrew using a screwdriver: Some panels may be secured with screws. Inspect the panel carefully and look for any visible screws. Use an appropriate screwdriver to remove the screws, and then proceed to gently pry open the panel.
- Refer to online resources: If you are unsure about the removal process for a specific panel or cover, consider referring to online resources such as vehicle forums or tutorial videos. These resources often provide step-by-step instructions and tips for removing panels in your specific vehicle model.
By following these steps and techniques, you can locate and access the factory stereo in your vehicle, allowing you to proceed with the installation of your 2-channel line output converter.
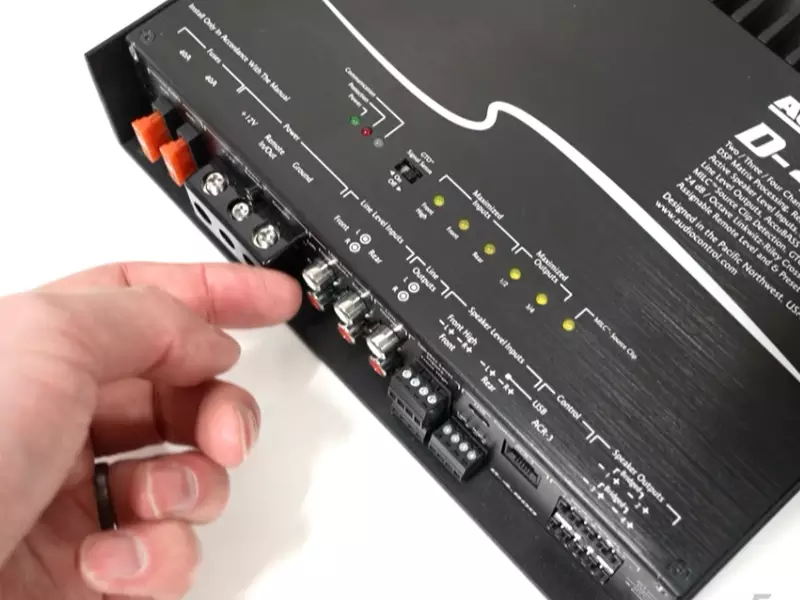
Connecting The Line Output Converter To The Factory Stereo
Properly identifying and connecting the necessary cables and wires
To connect a 2-channel line output converter to your factory stereo, it is crucial to identify and connect the necessary cables and wires correctly. Paying attention to these connections will ensure a seamless integration and optimal audio performance.
Here are the step-by-step instructions to help you connect the line output converter with precision:
Step 1: Identify the speaker wires
Begin by identifying the speaker wires in your factory stereo. You can consult the stereo’s manual or use a wiring diagram specific to your car’s model and make. The speaker wires are typically color-coded, making them easier to identify. Take note of the positive and negative terminals for each speaker wire.
Step 2: Locate the corresponding wires
Once you have identified the speaker wires, locate the corresponding wires on the line output converter. The converter should come with a detailed manual or instructions that indicate which wires are for input (from the factory stereo) and which are for output (to the amplifier).
Step 3: Strip the wires and connect
Using a wire stripper, carefully strip a small portion of insulation from each wire. Make sure to expose enough copper for a secure connection. After stripping the wires, match the positive and negative terminals of the speaker wires to the corresponding input terminals on the line output converter.
Step 4: Secure the connections
Once the wires are aligned, use a crimp connector or twist and tape method to secure the connections. Ensure that the connections are tight and well-insulated to prevent any loose or exposed wires.
Step 5: Connect the converter to the factory stereo
Now that the line output converter is properly connected to the speaker wires, it’s time to connect it to the factory stereo. Locate the RCA input cables on the converter and plug them into the corresponding RCA output jacks on the factory stereo. These connections will transmit the audio signal from the stereo to the converter.
Step 6: Connect the converter to the amplifier
Finally, connect the RCA output cables from the converter to the RCA input jacks on the amplifier. Double-check the connections to ensure they are securely plugged in. This step establishes the crucial link between the line output converter and the amplifier, allowing for the amplified sound to be sent to the speakers.
By following these steps and making the necessary connections correctly, you will successfully connect the 2-channel line output converter to your factory stereo. Enjoy improved sound quality and an enhanced audio experience in your car!
Making The Necessary Power And Ground Connections
When installing a 2-channel line output converter, it is essential to make the proper power and ground connections. These connections are crucial for ensuring optimal performance and a high-quality audio output. In this section, we will provide step-by-step instructions for connecting the line output converter to the power source and explain the importance of proper grounding techniques.
Instructions for connecting the line output converter to the power source
To properly connect the line output converter to the power source, follow these steps:
- Locate a suitable power source near the audio system. This source should have a constant 12-volt power supply, such as the car’s battery or a fuse box connection.
- Disconnect the negative terminal of the car battery to prevent any accidental electrical shorts.
- Identify the power wire leading to the audio system. This wire is usually color-coded and can be found in the car’s wiring harness.
- Using an electrical wire stripper, strip about half an inch of insulation off the power wire.
- Connect the power wire to the input terminal on the line output converter. Ensure the connection is secure and tight.
- Reconnect the negative terminal of the car battery to restore power to the system.
- Test the audio system to ensure the line output converter is functioning correctly.
Proper grounding techniques to ensure optimal performance
Proper grounding is essential for minimizing unwanted noise and interference in the audio system. Follow these techniques to ensure optimal performance:
Grounding to the car’s chassis:
Grounding the line output converter to the car’s chassis helps establish a stable electrical connection. To do this:
- Identify a suitable grounding point on the car’s chassis. This should be a bare metal surface free from paint or rust.
- Using a wire stripper, strip about half an inch of insulation off the ground wire.
- Connect the ground wire from the line output converter to the grounding point on the car’s chassis.
- Ensure the connection is secure and tight to establish a good ground.
Grounding to the car’s battery:
Grounding the line output converter directly to the car’s battery can provide a more stable and robust ground connection. Here’s how:
- Locate the car’s battery and disconnect the negative terminal.
- Using a wire stripper, strip about half an inch of insulation off the ground wire.
- Connect the ground wire from the line output converter to the negative terminal of the car battery.
- Tighten the connection to ensure a solid ground connection.
- Reconnect the negative terminal of the car battery to restore power.
By following these instructions and utilizing proper grounding techniques, you can ensure that your 2-channel line output converter is properly connected to the power source and has a solid ground connection. This will result in optimal performance and a superior audio experience.
Completing The Installation And Testing The Output
After properly connecting the 2-channel line output converter and adjusting the gain controls to match your amplifier’s requirements, it’s time to complete the installation and test the output to ensure everything is functioning as it should. Following the final steps and conducting testing will help you achieve optimal audio performance and avoid any potential issues down the line.
Final steps to secure all connections and tidy up the installation area
Once you have made the necessary connections and everything is properly adjusted, it’s important to secure all your connections and tidy up the installation area. This will help prevent any accidental disconnections and ensure a neat and organized setup.
Here are the final steps to secure all connections and tidy up the installation area:
- Double-check all connections: Carefully inspect each connection to verify that they are securely attached and properly seated. Make sure there are no loose wires or connectors.
- Use zip ties or cable management solutions: Gather any excess wires and use zip ties or cable management solutions to bundle and secure them. This will not only prevent any potential hazards but also give the installation a clean and professional look.
- Secure the line output converter: If the converter is not already securely mounted, use mounting screws or tape to fasten it in place. This will help prevent any unwanted movement or vibrations that could affect the audio quality.
- Test for any rattling or interference: Gently tap or shake the installed components to check for any rattling or interference. If you notice any unwanted noise, ensure that all components are securely mounted and adjust as necessary.
By completing these final steps, you can ensure that your connections are secure and your installation area is tidy, providing a reliable and visually appealing setup.
Testing the line output converter to ensure proper functionality
Testing the line output converter is important to ensure that the audio signal is being transformed correctly and that there are no issues with the output. Follow these steps to test the converter:
- Turn on the audio system: Start by turning on your audio system, including the head unit and the amplifier connected to the line output converter.
- Play a variety of audio sources: Test the output by playing a variety of audio sources, such as music from different genres, podcasts, or audio books. This will help you evaluate the performance across different types of audio content.
- Listen for distortion or noise: Pay attention to the audio quality and listen for any distortion, static, or unwanted noise. If you notice any issues, make sure that all connections are secure and try adjusting the gain controls on the line output converter.
- Adjust the audio levels: Use the gain controls on the line output converter to adjust the audio levels to your preference. Make sure not to introduce any distortion by setting the levels too high.
By testing the line output converter and adjusting as necessary, you can ensure that your audio system is delivering the best possible sound quality.
Common Installation Issues And How To Troubleshoot Them
Installing a 2-channel line output converter is a great way to enhance your car’s audio system by allowing you to connect aftermarket amplifiers and subwoofers. However, like any installation process, there can be some common issues that may arise. In this section, we will discuss potential problems that you may encounter during the installation process and provide troubleshooting techniques to help you address these issues effectively.
Potential problems that may arise during the installation process
Installing a 2-channel line output converter can sometimes be challenging, especially if you are not familiar with car audio systems. Here are some potential issues that you may face:
- Interference or buzzing noise in the audio:
- Incorrect wiring connections:
- Weak or distorted sound:
- Imbalanced volume levels:
- Ground loop issues:
Troubleshooting techniques for addressing these issues
It is essential to troubleshoot any issues that arise during the installation process to ensure optimal audio performance. Here are some techniques you can use to address common installation problems:
- Interference or buzzing noise in the audio: To resolve this issue, check for loose connections or faulty grounding. Ensure that all wires are securely connected and properly grounded. You may also need to isolate the converter from any power sources or devices that may be causing interference.
- Incorrect wiring connections: Double-check your wiring connections to ensure that they are correctly matched and connected. Verify that the positive and negative wires are properly connected to the respective terminals. Using a wiring diagram specific to your vehicle and audio system can help ensure accurate connections.
- Weak or distorted sound: If you experience weak or distorted sound, check the gain settings on your converter and amplifiers. Adjusting the gain settings can help enhance the audio output. Additionally, ensure that your wires are of sufficient gauge to handle the power requirements of your audio system.
- Imbalanced volume levels: If the volume levels between speakers are imbalanced, you may need to adjust the gain controls on your converter and amplifiers. You can also use a multimeter to measure the output of each channel and adjust accordingly.
- Ground loop issues: Ground loop issues can cause a buzzing or humming noise in your audio system. To troubleshoot, try connecting the ground wire of the converter to the same location as your head unit’s ground wire. Additionally, using a ground loop isolator can help eliminate ground loop problems.
By following these troubleshooting techniques, you can overcome common installation issues and enjoy high-quality audio performance from your 2-channel line output converter. Remember to consult your converter’s manual or seek professional assistance if you encounter any difficulties during the installation process. With a little patience and problem-solving, you’ll be able to create an impressive car audio setup that enhances your driving experience.
Tips For Optimizing The Performance Of Your Line Output Converter
Additional Steps to Enhance the Audio Quality and Functionality
You’ve successfully installed your 2-Channel Line Output Converter (LOC) and are ready to optimize its performance. By taking a few additional steps, you can enhance the audio quality and overall functionality of your LOC. Here are some tips to help you get the most out of your line output converter:
- Use High-Quality RCA Cables: To ensure superior sound quality, invest in high-quality RCA cables. These cables play a crucial role in transmitting audio signals from your car’s stereo system to the LOC. Opt for cables with gold-plated connectors for better conductivity and reduce the risk of signal loss.
- Secure Ground Connection: A solid ground connection is essential for optimal audio performance. Make sure that your line output converter is properly grounded to reduce the chances of interference and noise in your audio system. This can be achieved by securely connecting the ground wire to a clean metal surface in your vehicle.
- Adjust Gain Settings: The gain settings on your LOC determine the output signal strength. It is important to carefully adjust these settings to balance the audio levels and prevent distortion. Start by setting the gain at its lowest level and gradually increase it until you achieve a clean and clear sound without distortion. Remember, it’s better to have a slightly lower gain than a distorted audio signal.
- Check Polarity of Speaker Connections: Ensuring correct speaker polarity is essential for a well-balanced and accurate audio experience. Double-check that the positive speaker leads are connected to the positive terminals and the negative leads to the negative terminals. This small detail can make a significant difference in the sound quality produced by your line output converter.
Best Practices for Maintaining and Adjusting the Line Output Converter
To ensure the longevity and optimal performance of your line output converter, it is essential to adopt good maintenance practices and make necessary adjustments as needed. Here are some best practices to follow:
- Regularly Check Connections: It is a good idea to periodically inspect the connections of your line output converter. Ensure that all cables and wires are securely connected and free from any damage or corrosion. Loose or faulty connections can negatively impact the audio quality, so it’s important to address any issues promptly.
- Inspect and Clean Controls: Over time, dust and grime can accumulate on the controls of your LOC, affecting their functionality. Regularly inspect and clean the controls using a non-abrasive electrical contact cleaner. This will help maintain the sensitivity and accuracy of the controls, ensuring smooth performance.
- Recheck Gain Settings After Changes: If you make any changes to your audio system, such as upgrading speakers or amplifiers, it’s important to recheck and readjust the gain settings on your line output converter. This will help optimize the audio output and ensure that the new components integrate seamlessly with your LOC.
By following these tips and best practices, you can optimize the performance of your 2-Channel Line Output Converter and enjoy a superior audio experience in your vehicle. Remember, small adjustments and attention to detail go a long way in achieving the best sound quality from your line output converter.
Frequently Asked Questions Of How To Install 2-Channel Line Output Converter
What Is A 2 Channel Line Output Converter Used For?
A 2 channel line output converter is used to connect an aftermarket amplifier to a factory stereo system. It allows the amplifier to receive a higher quality audio signal from the stereo, resulting in improved sound quality and performance.
Do You Need To Power A Line Output Converter?
No, a line output converter does not require power.
Does A Line Out Converter Need To Be Grounded?
No, a line-out converter does not need to be grounded. It is designed to convert a speaker-level signal to a preamp signal and does not require a ground connection for its operation.
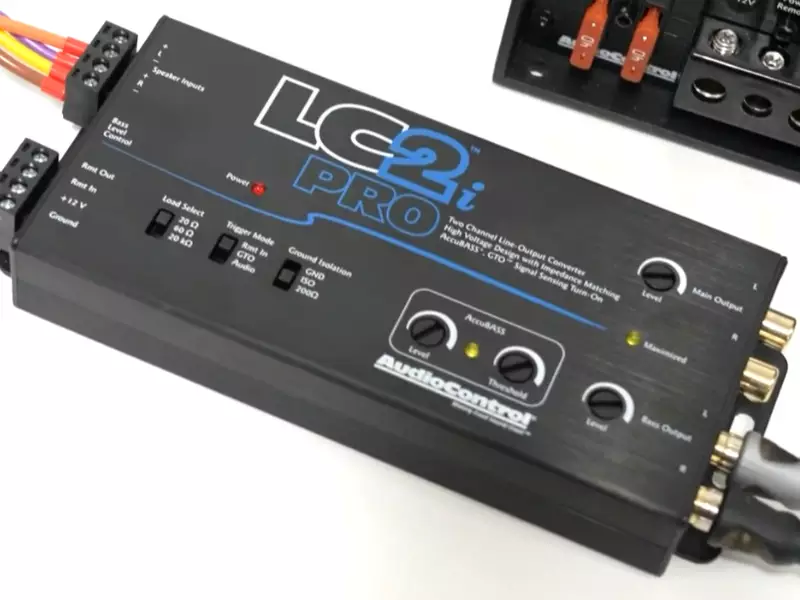
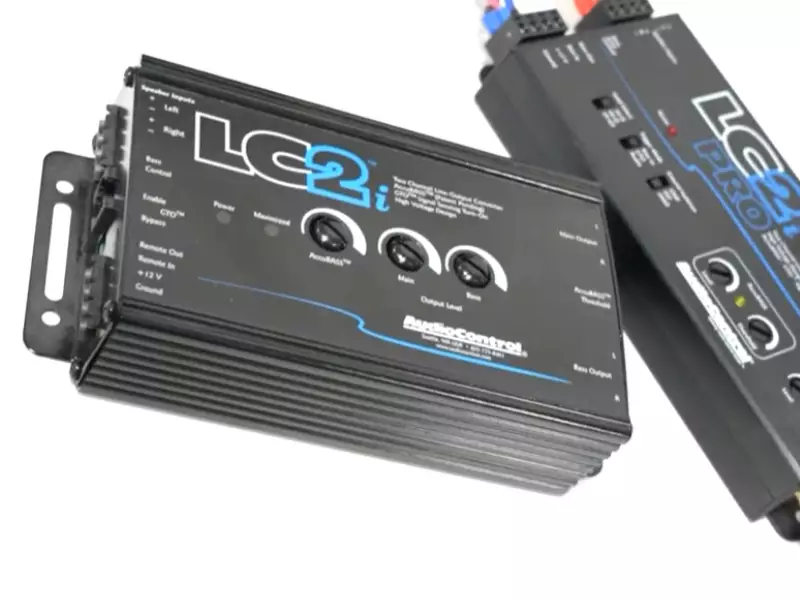
How To Install Lc2I Converter?
To install an LC2i converter, follow these steps:
1. Locate the RCA outputs on your stereo unit.
2. Connect the lc2i converter to the RCA outputs.
3. Connect the speaker wires to the lc2i converter’s input.
4. Connect the lc2i converter’s output to your amplifier.
5. Power on the lc2i converter and test the system.
Conclusion
Installing a 2-channel line output converter can greatly enhance your car audio experience. By converting speaker-level signals to line-level signals, you can seamlessly connect your amplifier or subwoofer to your factory stereo system. Follow the step-by-step instructions in this blog post to ensure a successful installation.
Remember, with the right tools and a little patience, you’ll be enjoying high-quality sound in no time. Happy installing!